Here you can find all information about how to update the existing products, or purchase additional ones using our NPlus updater tool for your sat nav (also known as PND or Portable Navigation Device) powered by our navigation software.
Instructions for Windows 10/11 (64-bit) users:
- NPlus Download and Installation
- Create an NPlus Account
- Choose Synchronisation Type
- Using NPlus to Buy/Update Products
NPlus Download and Installation
- Download NPlus to your computer here: NPlus for Windows - 64 bit
- Open the compressed zip file and then double-click on the NPlus installer file (NPlus.msi) to begin the installation wizard. Choose "Next" until the installation is finished.
|
|
Create an NPlus Account
-
After downloading and installing NPlus on your computer for the first time, you will need to create an NPlus user account. To do so, use the "Create account" link on the NPlus login screen.
- Fill all the required fields and tap the "Sign up" button to finish the account creation.
- You will receive an email confirming the account creation (no account activation required).
Note: Since the email you'll receive is coming from an automated process, it may not be shown in the Inbox folder of your email client. Add the email address support@ndrive.com to your Contacts list to guarantee you'll receive any future emails from NPlus.
Choose Synchronisation Type
Synchronisation via Mass Storage
By default, your sat nav should be configured to use the Activesync method, so you'll need to change it to Mass Storage.
In Mass Storage mode, the sat nav appears on your computer as a storage device when connected via USB, just like a USB flash drive.
This is the preferred synchronisation method if your sat nav has a Mass Storage option. Usually available by accessing the USB settings. Find below how to access it (the menus may differ on your sat nav model):
- Enable the "Mass Storage" option and use the "back arrow" icon or similar function to reset the sat nav so it can enter Mass Storage mode.
- Connect your sat nav to your computer using a USB to Mini USB type-B cable.
- Start NPlus and log in to your account.
Note: If you don't have this option, you'll need to use the Activesync synchronisation.
Synchronisation via Activesync (Windows Mobile Device Center)
This is the default synchronisation method most sat nav use, and should only be used if your sat nav doesn't support Mass Storage synchronisation.
Important Note: If you choose this option, you'll need to follow additional steps, since Windows 10 and 11 require Windows Mobile Device Center to be installed so your sat nav can be syncronised. Unfortunately, Microsoft discontinued the tool and no longer provides it on their website (as shown here), so we provide an alternative link instead. You may also need to apply the patch on step 3 after every major Windows Update.
Windows Mobile Device Center, even if no longer available on the Microsoft Website and discontinued by Microsoft, is still compatible with Windows 10 and Windows 11, provided that you follow the instructions below:
- Download Windows Mobile Device Center 64-bit here: Windows Mobile Device Center
- Double-click the downloaded file (wmdc-64-bit-drvupdate-amd64.exe) to install WMDC. This consists in two installation parts.
- Download the Windows Mobile Device Center Fix patch here: WMDC-fixes-for-Win10
- Right-click the downloaded patch, and choose Run as Administrator to start the utility.
- Restart your computer. You are now ready to use NPlus and Windows Mobile Device Center.
- Connect your sat nav to your computer using a USB to Mini USB type-B cable.
- Tap the Windows Start Button on your keyboard, then type "Windows Mobile Device Center" and then choose the top result to start Windows Mobile Device Center.
- After starting Windows Mobile Device Center, the Connected status will be shown as the picture below:
- You can now start NPlus and your sat nav will be identified successfully.
Note: If you're experiencing connectivity issues such as Windows Mobile Device Center failing to find the sat nav, or you're hearing the usb connection sound on your computer repeating several times, then use a different USB port to prevent device conflicts. If using a Desktop computer, try using the USB ports located on the back.
Using NPlus to Buy/Update Products
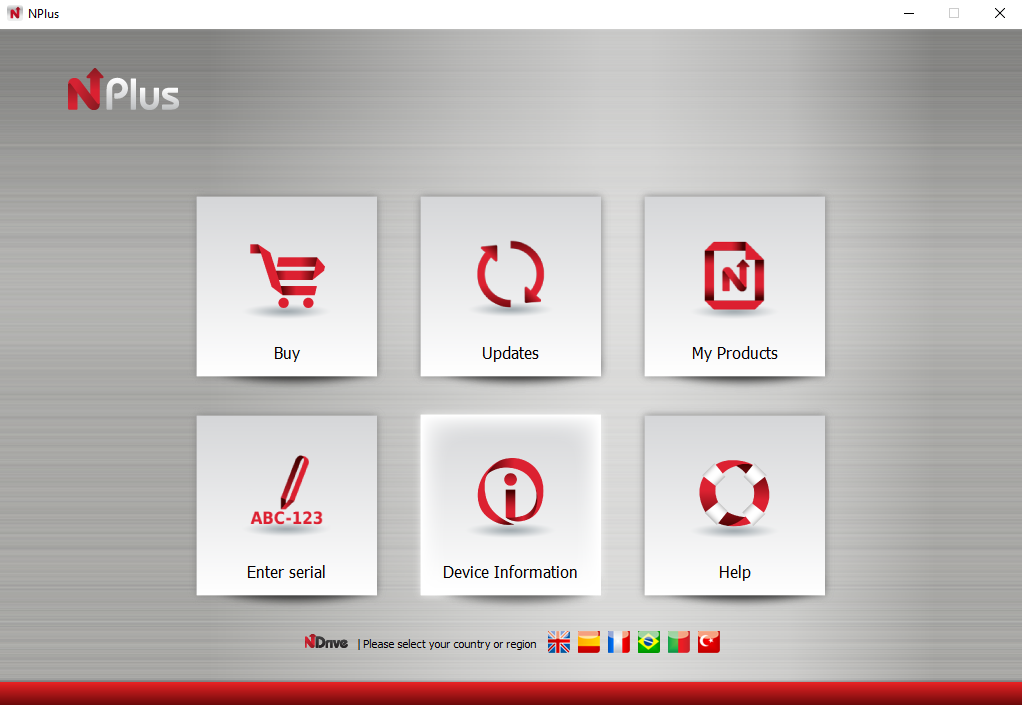
- Every time you start NPlus, you will need to login, so please make a note of your login details for future use. After logging in, you will be shown the main NPlus screen from where you are able to make purchases/select updates and install them onto your device.
- Select Buy to be taken to a different screen where you will be able to purchase additional maps, additional language voices and TTS voices (Text To Speech). You can select and purchase items here, which can then be downloaded and installed via the My Products section.
- Select Updates to have NPlus check your device for any available map updates. If updates for your device are available, then a list of updates will be shown.
Comments
0 comments
Article is closed for comments.